Free Shipping in the USA on nearly all items!
Limited phone hours during the Holidays! Call us: 888-611-9305
Free Shipping in the USA on nearly ALL items! Limited phone hours during the Holidays!

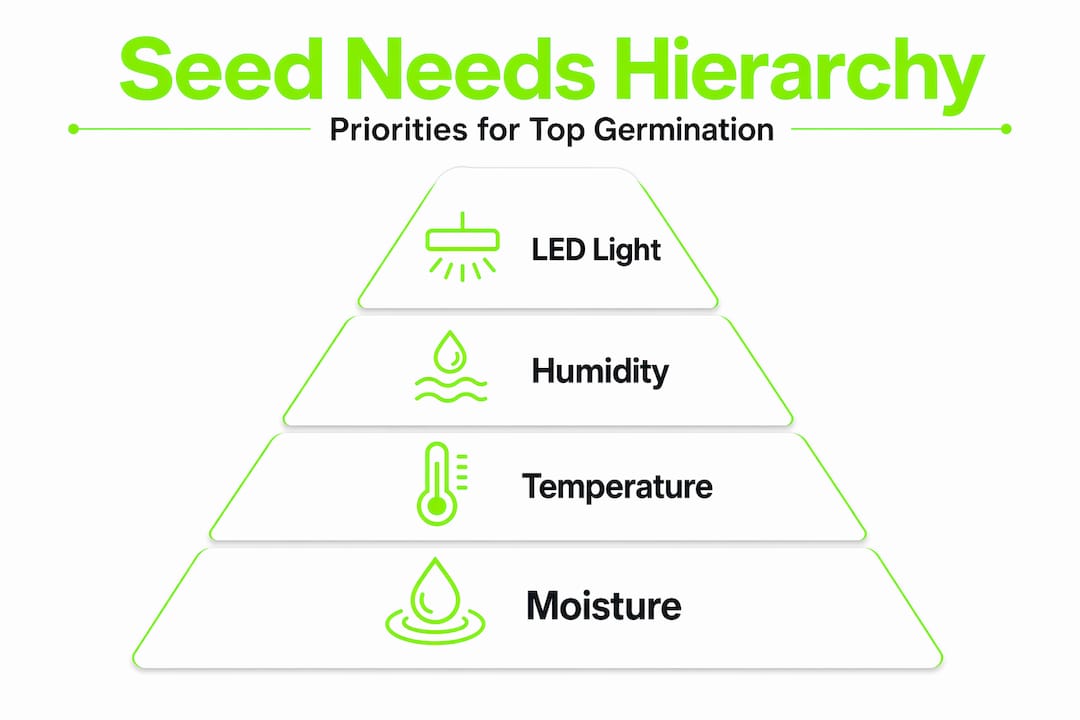
If you’ve ever started seeds indoors only to end up with pale, floppy seedlings that topple over before they even reach the garden, insufficient light is almost always the culprit. Seed germination under LED lights solves this problem better than any other artificial lighting method available to home growers today. The right LED setup gives you control over spectrum, intensity, and timing in ways that fluorescent tubes and incandescent bulbs simply can’t match. This guide walks you through everything you need: choosing the right light, setting up your environment, and running a step-by-step germination process that produces compact, vigorous seedlings every time.
| Point | Details |
|---|---|
| Spectrum matters at germination | Red-dominant LED spectra improve germination rate, uniformity, and early vigor compared to blue-heavy lights. |
| Not all seeds want light right away | Many vegetables germinate in darkness; herbs and flowers often need light from day one to trigger sprouting. |
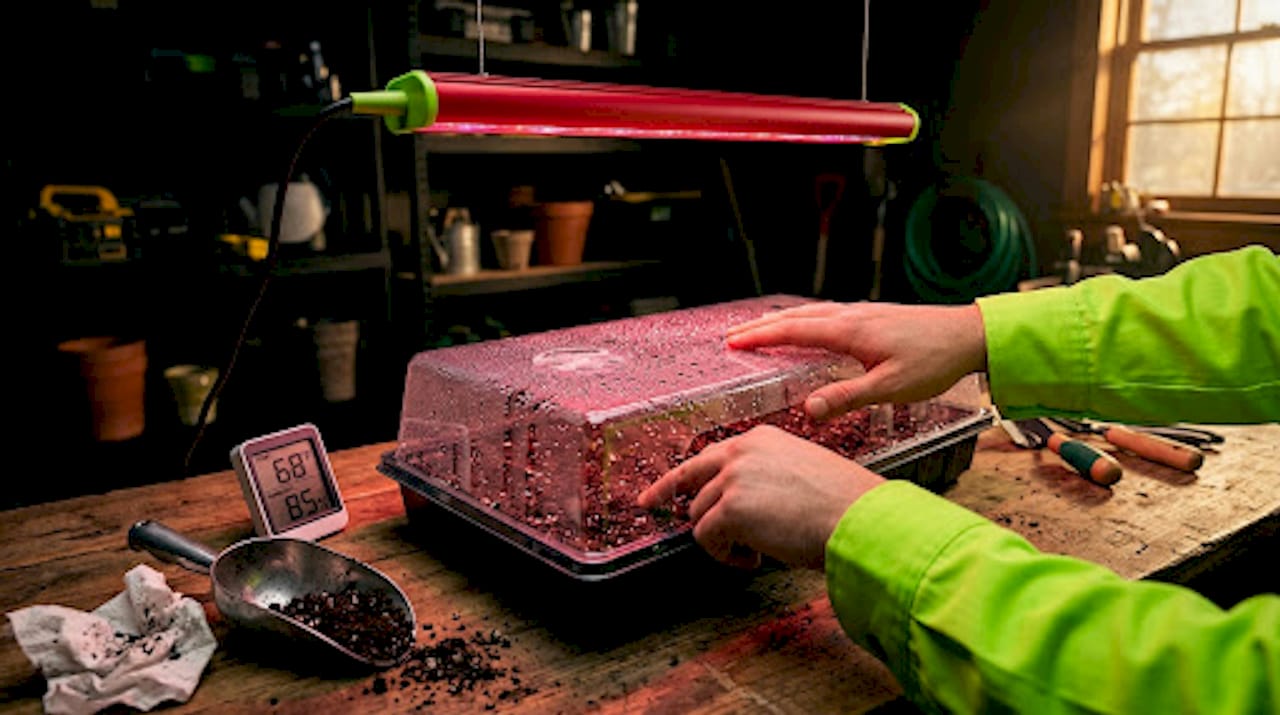
| Temperature and humidity are non-negotiable | Keep soil at 18–25°C and humidity near 100% during germination, then drop both after sprouts emerge. |
| Light distance is critical | Start LEDs 2–6 inches above seed trays and raise the fixture as seedlings grow to prevent stretching. |
| Troubleshoot early | Leggy seedlings, damping-off, and uneven germination all have fixable causes when you catch them within the first week. |
The technical term for using artificial light to trigger and support plant emergence is photomorphogenesis, the process by which light signals shape plant development from the moment a seed coat cracks open. LED grow lights for seeds are particularly effective because they let you dial in the specific wavelengths that matter most during this phase, rather than flooding your seed trays with the full solar spectrum at full intensity.
Red-dominant LED spectra significantly increase germination percentage, rate, and uniformity compared to blue-heavy alternatives. In practical terms, that means more seeds sprouting at the same time, which makes your whole growing schedule more predictable. Full-spectrum LEDs in the 5000K to 6500K color temperature range provide the balanced blue and red wavelengths that support both germination and the early photosynthetic development that follows.
Beyond spectrum, LEDs produce far less heat than older lighting types. LEDs use roughly half the electricity of fluorescent lights and last over 50,000 hours, which also means you can position them close to seed trays without cooking your seeds or drying out your growing medium.
Light gets most of the attention, but your seeds will fail without the right temperature, humidity, and moisture levels regardless of how good your LEDs are.
Temperature is the single biggest variable most beginners underestimate. Most seeds germinate best between 18–25°C, but cold soil below 10°C either delays germination significantly or causes seeds to rot before they sprout. Peppers and basil want the upper end of that range. Lettuce and spinach are happy at the lower end. A seedling heat mat under your tray solves this problem completely for around $20.
Humidity follows a two-stage pattern that most guides skip over:
Pro Tip: Mist the surface of your growing medium rather than watering from below during the first few days. It keeps moisture even without disturbing seeds that haven’t anchored yet.
The relationship between moisture and air exchange is where damping-off disease starts. That’s the fungal collapse that kills seedlings at the soil line almost overnight. High humidity combined with stagnant air is the cause. Gradual ventilation after radicle emergence is the fix.
Not all LED grow lights are built for the germination phase. Here’s what to look for when selecting the best lights for germination.
For seed starting under LED, prioritize lights in the 5000K to 6500K range. This “cool daylight” range provides enough blue light for compact, stocky growth while including the red wavelengths that drive germination. A balanced but red-heavy spectrum improves uniform emergence and early vigor. Avoid lights marketed purely for flowering and fruiting, since those are tuned for a different growth stage.
PPFD (photosynthetic photon flux density) measures the amount of usable light hitting your seed tray per second. Seedlings need far less than mature plants. Target 50 to 150 µmol m⁻² s⁻¹ during germination and early seedling stages. Moderate intensities around 110–160 µmol m⁻² s⁻¹ with a balanced spectrum produce the best biomass and quality in seedlings. You don’t need a $500 light for this phase. A mid-range panel works well.
| Feature | LED grow lights | Fluorescent (T5/T8) | Incandescent |
|---|---|---|---|
| Energy use | Low | Medium | High |
| Heat output | Very low | Low to medium | High |
| Lifespan | 50,000+ hours | 10,000–20,000 hours | 1,000–2,000 hours |
| Spectrum control | Full, adjustable | Limited | Very limited |
| Placement distance | 2–6 inches | 2–4 inches | 12+ inches |
Pro Tip: If you’re buying your first LED panel for seed starting, look for lights with a dimmer function. You can run them at 40–50% intensity during germination and ramp up as seedlings develop, which extends bulb life and prevents light stress on delicate sprouts.
For beginners, the Mars Hydro TSL 2000 is a practical choice. It covers a solid footprint, runs cool enough to place close to trays, and delivers a full spectrum suitable for both germination and early seedling growth. Check the LED grow lights blog at Ledgrowlightsdepot for detailed positioning guides specific to different seed types.
Follow this process and you’ll have consistent, healthy sprouts within the expected germination window for your seed variety.
Select and prepare your seeds. Start with fresh, high-quality seeds. Soak large or hard-coated seeds (like beans, squash, or morning glories) in room-temperature water for 8 to 12 hours before sowing. This softens the seed coat and speeds germination.
Fill trays and moisten your growing medium. Use a sterile seed-starting mix, not garden soil. Fill cells or trays to about 1/4 inch from the top. Moisten the mix thoroughly before sowing so water doesn’t displace seeds after planting.
Sow at the correct depth. A general rule: sow seeds at a depth equal to twice their diameter. Tiny seeds like lettuce and basil get pressed onto the surface and barely covered.
Decide when to turn on your LEDs. This step is where most beginners go wrong. Many vegetable seeds don’t need light until after sprouting, but many herb and flower seeds require light from the moment of sowing to trigger germination. Check your seed packet. If it says “surface sow” or “needs light to germinate,” switch your LEDs on immediately. If not, you can wait until sprouts emerge.
Cover trays and set your environment. Place a clear dome over your trays to maintain high humidity. Set your heat mat to 21–24°C for most vegetable seeds.
Run LEDs on a 14 to 16 hour daily schedule. A 14–16 hour photoperiod is the standard recommendation for indoor seed starting. Use a timer so you don’t have to think about it.
Monitor and ventilate after sprouting. Once you see the first sprouts, remove the dome during the day and replace it at night for two to three days. After that, remove it entirely.
Adjust light height as seedlings grow. Start with LEDs 2–6 inches above the tray and raise the fixture as seedlings gain height. If seedlings are leaning toward the light or stretching tall and thin, lower the light or increase intensity.
Begin feeding after true leaves appear. The first leaves (cotyledons) use stored seed energy. Once the first true leaves open, begin diluted liquid fertilizer at half the recommended strength.
| Germination stage | Light needed | Humidity target | Temperature |
|---|---|---|---|
| Pre-sprout (days 1–5) | Species-dependent | ~100% | 21–25°C |
| Radicle emergence | Begin LEDs if not already on | ~80% | 20–24°C |
| First leaves open | Full 14–16 hr photoperiod | ~60% | 18–22°C |
| True leaves forming | Full photoperiod, raise light | ~40% | 18–20°C |
Pro Tip: Label each cell or row with the seed variety and the date sown. When you’re troubleshooting uneven germination later, knowing which seeds were planted when saves a lot of guesswork.
Even with good lights and a solid setup, things go wrong. Here’s how to read the signs and fix them fast.
Pro Tip: If you’re running a mixed tray with both light-requiring and light-neutral seeds, keep LEDs on from day one. The light-neutral seeds won’t be harmed by it, and the light-requiring seeds get what they need from the start.
Treating light as a timed environmental cue rather than a constant input is the mental shift that separates growers who get consistent results from those who don’t.
Strong germination under LEDs produces seedlings that are compact, uniformly colored, and standing upright without support. Here’s what to watch for as your seedlings develop:
Once true leaves form, a balanced blue and red spectrum continues to support biomass development and nutritional quality. Before transplanting outdoors, harden off seedlings over 7 to 10 days by placing them outside in a sheltered spot for increasing periods each day.
I’ve run a lot of germination trials at home, and the single biggest mistake I see beginners make is treating their LED setup as a “set it and forget it” system. More light is not always better. I learned that the hard way when I fried a tray of basil seedlings by running a full-power panel six inches above the tray for 18 hours a day. The seedlings looked fine for three days, then bleached out completely.
What actually works is treating light as one variable in a system. When I started paying attention to the red-to-blue ratio in my panels and running lights at 50% intensity during the first week, my germination uniformity improved noticeably. Tomatoes that used to come up staggered over five days started emerging within a 48-hour window.
The humidity transition is the other thing nobody talks about enough. I lost entire trays to damping-off before I understood that the dome needs to come off gradually, not all at once. That one change saved more seedlings than any light upgrade I’ve made.
My advice: start simple, observe closely, and adjust one variable at a time. Your seeds will tell you what they need if you’re paying attention.
— Scott

Getting seed germination right indoors starts with having a light that actually matches the job. At Ledgrowlightsdepot, you’ll find a curated range of LED grow lights built specifically for every stage of indoor growing, from germination through harvest. Whether you’re starting a few trays of tomatoes or running a full indoor setup, there’s a panel that fits your space and budget. The HLG 100 (4000K) is a standout option for seed starting: efficient, cool-running, and dialed into the spectrum range that produces compact, vigorous seedlings. With a 4.8 out of 5 rating from over 5,800 customers, Ledgrowlightsdepot backs every purchase with expert support and a satisfaction guarantee.
It depends on the species. Many vegetable seeds germinate in darkness and only need light after sprouting, while most herb and flower seeds require light from the moment of sowing to trigger germination.
Start with your LED panel 2 to 6 inches above the seed tray and raise it as seedlings grow taller to prevent stretching and light stress.
Full-spectrum LEDs in the 5000K to 6500K range work well for most seeds. Red-dominant spectra improve germination rate and uniformity, while balanced blue and red wavelengths support healthy seedling development after sprouting.
A 14 to 16 hour daily photoperiod is the standard recommendation for indoor seed starting under LED grow lights. Use a timer to keep the schedule consistent.
Leggy seedlings are a sign that light intensity is too low or the fixture is too far from the tray. Lower the light or increase output, and make sure you’re running at least 14 hours of light per day.
{"one"=>"Select 2 or 3 items to compare", "other"=>"{{ count }} of 3 items selected"}


Leave a comment